
 |
Home | |
|
About DADRL | |
|
The DRL Story | |
|
News | |
|
Studies | |
|
FAQ's | |
 |
Disable DRLs | |
|
Join DADRL | |
|
Links | |
|
Contact | |
HOW TO DISABLE DRLs
DISCLAIMERThis information is provided to help those who wish to disable the DRLs on their vehicle. The advice given here was contributed by several people. We give no guarantee whatsoever with respect to its accuracy. USE AT YOUR OWN RISK! We will not be held responsible for ill side effects to your vehicle or to you physically as a result of performing any of the methods described herein. PLEASE TAKE ALL PRECAUTIONS. |
First off, as of December 2010, there are no federal laws in the US that mandate DRLs on passenger vehicles. In fact, The National Highway Transportation Safety Administration has denied a petition from General Motors to make DRLs mandatory. If your dealer refuses to disconnect your DRLs, saying "they're a mandatory safety item," then your dealer is lying, plain and simple.
Quick links: GM general | GM specific (Chevy, GMC, Pontiac, Buick, Saturn) | Audi | BMW | Chrysler/Dodge | Ford | Honda/Acura | Hyundai | Jeep | Kia | Lotus | Mazda | Mitsubishi | Nissan | Saab | Subaru | Suzuki | Toyota/Lexus | Volkswagen | Volvo
Also use your browser's search feature to find your vehicle on this page.
If you can contribute information to this list, please e-mail us at
info //-AT-// LightsOut.org
(replace "//-AT-//" with "@")
Those of you who have already contributed - THANKS!
GM General Information
It may help you to know that if you plan on ordering a new General Motors car or truck, but don't want DRLs, you don't have to have them. Simply insist that the car be ordered with RPO T62. RPO means "Regular Production Option" T62 "Lamp System Daytime Running - Delete." (Unofficial list of 2002MY GM truck RPOs) Remember, DRLs are not mandatory in the United States. You don't have to have them if you don't want them. If buying from stock, INSIST that the dealer disable the DRLs as a condition of sale. Contrary to what the dealer might say, there is no law in the US preventing them from doing so.
Many GM have a "DRL fuse", associated with a DRL Module & and up to 3 relays. Usually HI beams in series. Some the LO beams are reduced by 2 volts with a double diode assembly. Some, the fuse also controls the Fog lights and "automatic lights on" at dusk feature. Other cars the fuse will not deactivate the fogs and auto "ON". 1999 and 2000 more likely to have the "auto on" feature, related to the GM liability for no tail lights at night.
On some newer GM models it may be possible to press the "Dome Override" button 3 or 4 times within 6 seconds. This will disable the DRLs while the vehicle is running. When it is restarted, the DRL function will reset to "always on." We've heard that this works on full-size and S-series trucks.
There are a some inexpensive DRL switch options available from www.EasyPerformance.com and www.ZZPerformance.com for some GM models.
I believe most recent GM models (99+), use a VCR tape sized DRL module that will be under the dash, behind radio, glovebox, over pedals, etc. There are two 8 pin connectors, the smaller blue connector C2; A is GND, B is NC, (jump A to B to disable) or pin C (pink) is ignition power, if fused separately, just remove fuse or disconnect power wire. Here's a site with excellent directions and pictures. Failing to find the module, there is a headlamp relay (5 pins) located in the engine compartment or near the steering column, and if you bend over one of the coil pins, #85 or #86, or the normally open contact #87, that will disable the DRL. (#30 and #87a are needed)
- 94-97 S-10/Blazer, Diode in fuse panel, left end of dash
- 97 Chev Lumina, Monte Carlo #33, fuse in RH side of dash.
- 98 Cadillac, Fuse under hood
- 98 Sunfire, supposedly computer controlled "owner option" fuse?
- 99 Pont Grand Prix; has 16 pin DRL module, fuse removes DRLs and Auto-ON (there is also a fuse for air bags, SRS)
- 2000 Camaro, direction signal DRL module behind radio
GM cars that I have seen, the DRL has a switch at the parking brake.
To defeat DRLs while driving, simply a jumper at switch.
(Note, this may illuminate the BRAKE light on your dashboard,
making brake system failures unreportable!).
UPDATE: As of 2003, GM cars now sense when parking brake is set and the
vehicle is moving more than 3 mph. If both are true, DRL's are turned on
automatically.
GM Specific Models
2002 Cadillac STS I looked under the hood and popped the cover off the fuse box. Under the lid is a diagram of the fuses with labels. One of them (#24 on my model car) said "DRL" on it. I pulled that fuse and voila! Success and everything else is still working just fine.
1999-2000 Cadillac STS I'd like to add a simple method for disabling DRL's WITH NO KNOWN NEGATIVE SIDE EFFECTS. On my 1999 Cadillac STS, the high beam bulb is used for the DRL. I cut the negative (ground) wire feeding this bulb, and attached (grounded) it to another metal screw (any other grounding source) by another piece of wire under the hood. I was pleased to find out that (for some reason) the daytime running lights were no more. Also, the high beam headlight switch remained fully operational, activating the high beams at night when desired, and during the day as a "flash to pass feature."
1996-2002 Cadillac Eldorado
1996-1997 Cadillac Seville
1996-1999 Cadillac Deville
Info for all three at
Cadillac Forums
posted by user CadillacSTS2003.
2005 GM full size vans
These have turn-signal DRLs that can be turned off at the switch, but you
need to do that every time you start the van. Normally the headlight switch
is in the 'DRL' position. Presumably the spring that returns the headlight
switch to 'DRL' (from 'off') could be removed from inside the switch and you
would have a normal headlight switch with DRL's optional yet fully functional
if you left the switch in the 'DRL' position. Unfortunately, this is not
the case. The DRLs still come on if the vehicle is started with the light
switch in the left position.
2000-2002 Buick Century
- Locate Body control Module (BCM). This unit is a black box approximately 6" square and 1-1/2" thick with 4 connectors entering one end. Hunting with the door open and key in the ignition, follow your ears to the chime inside. On the 2000-2002 Buick Century, it resides to the left of the steering column, right above your left foot. There is a bump in the fuzzy trim panel that covers the under dash area that gives clearance to the BCM wiring harness. The trim panel does not have to be removed completely to get in far enough to work. Pull out a couple of the panel retainers and work the left end down and back until you have working room. Those panel retaining fasteners are a push in "Christmas tree" type and can be difficult to remove. Persevere, this is the hardest part, The actual mods are easy.
- The 4 connectors should now be visible almost even with the bottom of the dash. The connectors are color coded for identification. The first connector is C1, and is blue. We will be working with 4 out of the 7 wires in this connector. Locate the light blue, light blue w/white stripe, dark blue, and dark blue w/white stripe. The white striped wires are the front left and right feeds from the turn signal switch. The plain color wires go to the front left and right turn signal lamps. Very simply, cut all 4 wires about an inch from the connector and separately insulate the wires from the connector. Splice (and insulate) the like colors together that go into the harness. Dark blue to dark blue w/white, and light blue to light blue w/ white stripe. This removes the DRL function from the front turn signals.
- The second connector is C2, and is purple. We will be working with only 2 of the 14 wires in this connector. Locate the yellow w/black stripe, and immediately adjacent to that, find the light green w/black stripe. These two wires connect to the Ambient Light Sensor. Cut these two wires about an inch from where they emerge from the harness. Connect a 4700 Ohm resistor (1/4 watt is fine) across the wires from the connector, and insulate. This makes the BCM stay in the daylight mode, and disables the automatic headlight function.
- Test your work. Check operation of turn signals and headlights. Replace trim panel and congratulate yourself for a job well done.
2001 Buick Regal LS
Toasted1Too writes:
All that needs to be done is access the BCM and
1) locate connector C3 wire A4 (gray with black stripe),
cut it and install a toggle switch between the cut ends,
that takes care of the auto park lamps.
2) locate connector C3 wire A11 (white), cut it and install
a toggle switch between the cut ends, that covers the auto head lights.
These toggles can be remotely located with some wire and a little time.
This method provides the ability to switch between automatic operation and manual operation using the toggles and the headlight switch will still work regardless of the position of the add on toggles. It does prevent the instrument cluster from lighting up except for the PRND321 and odometer but my intention is to reduce the load on the alternator and battery while waiting or when warming the engine in the winter.
1999 Buick LeSabre
Buicks can be difficult to defeat the DRL circuits, because the DRL
function is built into their LCM (Light Control Module)
All outside lighting functions are controlled by the LCM, which has
preprogrammed IC's. The key to defeating the DRL function in the
Buick LCM is the keep the Park signal high (+12V).
If you just want to permanently defeat the DRL
function, here is how you do it.
Cut the lite Green wire going to pin A8 a few
inches from the connector on the LCM.
Remove about 1/4" of insulation from the Pink A7
wire a few inches from same connector.
Now, remove about 1/2" of insulation from the lite
Green wire that comes from the connector
and wrap it tightly around the bare area of the
Pink wire. Tape up this joint, and tape up
the cut end of the lite Green wire.
That's it. Holding the Park lite Green wire at 12Volts whenever the Ignition is on makes this system think that you always have the car in park and therefore, it will never engage the DRL function. Don't do this at the park switch, or you will screw up your automatic door locks!
Where is the LCM? on Le Sabre's, its mounted on the center of the firewall, low, just above the floor "hump". Push it towards the drivers side will disengage it from it's mounting clips. If your Buick does not have a rear seat heating duct connected to the heating ducts, then you will have to remove the plastic block off plate, which has a piece of plastic on it's left side blocking you from pushing the LCM towards the drivers side so that you can disengage it from it's mounting clips. Other Buick models seem to have the LCM mounted under the dash behind the glove box.
Want to have a switch to select "with or without" DRL? Get a 2 position, 3 terminal switch & about 6' of small wire. Cut 3, 2' pieces of wire and connect them to your switch. Cut the lite Green wire going to pin A8 a few inches from the connector on the LCM. Remove about 1/4" of insulation from the Pink A7 wire a few inches from same connector. Connect the wire from the center pin of your switch to the lite Green wire going to pin A8 of the LCM's connector. Using one of the other 2 wires from your switch, connect it to the other end of the lite Green wire. Using the last unused wire from your switch, connect it to bare place on the Pink wire. Tape up all of your connections. Find a handy place and mount your switch. Moving the switch from one position to the other will permit or defeat the DRL function in your Buick, without disturbing any other functions in your car.
1998 Buick LeSabre
The 1998 Buick LeSabre (and probably other years) has a very annoying
combination of features: DRLs and automatic headlights without
override. The Automatic headlights would go on when the car was under
a bridge, in a shadow, etc, and could not be turned off except by
ambient light. Very annoying, especially since this would dim the
radio display, etc, during the day. I have taken the car to a shop to
have it modified in a way that is unique to this type of car; the
chassis computer has been fooled into thinking the car is always in
PARK. The Automatic headlights now function once and can be
overridden (meaning you can put them out if you go under a bridge,
etc, but if you start the car at night, or drive into the night, they
will come on automatically). Since the DRLs function off of the gear
selector and not the parking brake, they never come on any more.
There have been some negative side effects to this procedure; firstly
is the disabling of the automatic locks, and secondly the pilot light
that lets you know the headlights are on no longer functions. There
is an under-dash switch that bypasses the modification. Any competent
car electric shop should be able to do this for <$100 (I paid $55).
The automatic headlights were a special nuisance to me since I have to
go on a military base and when you pass through the gates you should
dim to parking lights.
Buick LeSabre (unknown year)
To disable you Buick Lesabre DRLs, simply remove fuse 24 in
the engine compartment fuse block. For good measure, you
can also remove relay #30 from the same panel.
1997 Buick Park Avenue (confirmed for 2001 also)
This procedure describes how to deactivate the DRL's on a 1997 Buick
Park Avenue by duplicating the factory RPO T62 (no DRL) wiring
configuration option, and is probably applicable to most GM cars
1997-present that use high-beam DRL's along with an automatic headlamp
system. The only side effects are that the security system and
perimeter lighting will no longer be able to flash the DRL's, so only
the parking lamps will come on when you activate the security system
or perimeter lighting. The automatic headlamps at night and the
flash-to-pass feature still work normally.
Deactivating the DRL's. To deactivate the DRL's, remove the driver's side headlamp assembly; on my '97 Park Avenue, this was held in place using two thumbscrews atop the assembly, accessible from under the hood (do NOT mess with the aiming screws) and pull the assembly straight forward to pop the rear retaining pin out of its socket in the fender. After it is loose, unplug or twist and remove the turn illuminator lamp (rearmost bulb in the assembly) if necessary so you can pull the assembly out far enough to see what you're doing.
Locate the "ground" wire of the driver's side HIGH beam headlamp (the lamp closest to the car's centerline); on my '97 PA, this wire is black with a white stripe. You can verify that this is the wire you want by unplugging the headlamp connector and verifying that this wire is +12V when the DRL's would be on (DAYTIME, ignition ON, headlamp switch OFF, transmission in D) and that it becomes a chassis ground when the high-beam headlamps are ON (nighttime or headlamp switch ON, with the high beams activated). Cut this wire at a spot several inches from the headlamp connector.
Carefully endcap the end of the cut wire coming from the control module (the chassis wiring harness end, NOT the headlamp assembly end), to prevent shorts. Then splice the headlamp end of the cut ground wire into the ground wire of the low-beam headlamp (solid black on my car; use a multitester to verify that it's a ground). Solder the splice well to prevent loose connections, tape and insulate it, put everything back together, and you're done. The headlamp wiring now duplicates the factory RPO T62 wiring as described in the factory shop manual.
If you want to get fancy, you can ground the high-beam headlamp through a weatherproof 25A SPDT switch under the hood - one of the plastic air box struts is a good place to put it - with one side of the switch going to the lamp control module and the other side going to a chassis ground, and the wire from the headlamp going to the center contact. This allows you to switch the car between the regular and RPO T62 configuration if desired, but don't attempt it unless you know what you're doing. Suitable weatherproof switches are available from West Marine or other boat stores.
Why this works. When operating the regular high beam headlamps (not DRL's), the Lamp Control Module (LCM) feeds +12VDC to both headlamps separately; the passenger side headlamp grounds through a nearby chassis ground, and the left driver side headlamp grounds through the LCM itself since it has no local chassis ground. In this mode, the high beam headlamps are operating in parallel.
When the headlamps are off and the DRL's are triggered, the LCM feeds +12VDC to the "ground" wire of the driver's side high-beam headlamp, and the current flows in "reverse" through the driver's side headlamp and grounds through the passenger side headlamp. In this mode, the high beam headlamps are operating in series, decreasing the current (and light output) somewhat.
On cars equipped with the RPO T62 (no DRL) option, the driver's side headlamp is grounded to a local chassis ground instead of through the LCM, and the DRL wire from the LCM is either deleted or endcapped. The above procedure duplicates this configuration.
2001 Buick Park Avenue - disable auto headlights.
- Remove the light sensor. It is located on the top of the dashboard, in the center, near the bottom of the windshield. The top is round, approximately 1/2-inch in diameter, with a smaller translucent circle in the inside. It can be pried out rather easily with a screw driver.
- Immediately below the top of the light sensor assembly is attached the actual sensor, a small metal disc which looks not unlike a thick watch battery. From the disc come two small wires, on opposite sides.
- When the sensor senses light, it completes the circuit, connecting the two wires. When it does not sense light, it breaks the circuit, triggering the automatic night-time lights. To disable those automatic lights, permanently connect the two wires. I did this by taking speaker wire and attaching an end to each of the wires coming from the sensor. Soldering them is probably a good idea as well. Once those two wires are connected below the sensor, it doesn't matter what the sensor does: the circuit will always be completed. And a completed circuit in this case equals daytime, as far as the lights are concerned.
- After the wiring is secure, put the sensor assembly back in its spot. It's oriented a certain way, so you may have to rotate it until it goes back in. Once it's oriented properly, just push it back in until the top is flush with the top of the dashboard. If you complete these steps as well as the steps for disabling DRLs, you will actually be able to decide yourself when you want your lights on.
- I haven't noticed any unintended consequences, but I will update if I do.
2005+ Chevy Corvette (C6)
1. In the passenger footwell, lower the front carpet.
2. Remove the foot panel.
3. Locate the IPEC (Instument Panel Electrical Center) It looks like the fuse box next to the battery.
4. Remove the cover of the IPEC.
5. Turn it over and find the diagram of the components.
6. Locate relays 38 and 40. (38 controls the right DRL and 40 the left)
7. Pull each relay and carefully remove the cover.
8. Insert some type of insulator between the relay contacts (matchbook cover cardboard or the plastic from a coffee can lid works well) that you have cut to fit.
9. Replace relay cover, replace relay, replace IPEC cover, replace the footwell.
10. DONE!!
Source:
CorvetteForum.com
2005 Chevy Astro and Safari
Remove the plastic cover from the B pillar behind the driver's seat
(or just loosen it enough to swing the bottom outward) and unplug the
large diode used to drop the voltage.
To disable Automatic Headlights (which also turn on the dash lights and all the other exterior lights), pull the center defroster grill out, unplug the sensor and insert a 2k ohm resistor into the plug (cover it with tape so the leads cannot short to anything metallic under the dash). This fools the computer into thinking that it is a bright sunny day outside. Leave the sensor where it is, replace the grill, and you're done.
2003 Chevy Astro and Safari
It is in RELAY BLOCK # 2, hidden just above the DTC connector.
There are 2 relays in the block, the DRL and the RAP -which controls the items that are powered after the key is shut off. Radio and windows work until a door is opened or 20 minutes goes by.
The relay block is held onto a plastic bracket with 2 plastic rivets I guess they would be called. They are hollow with a plastic peg that when pushed in expands them.
I pried the relay block off the bracket as it is not possible to pull the relays when it is in situ as they are mounted from the top.
There is a cover over the relays for no apparent reason beyond making it more difficult to find them?
Anyway, after I got the relay block out, pulled the relay and bent over the 87 pin as mentioned in your info for various GM vehicles. Fixed, no more DRL and all lights working.
Pushed the centers out of the mounting rivets and replaced relay block in position, inserted expander pegs into rivets and done.
1999 Chevy Astro LS
It's as simple as pulling out the 20A fuse in position #15 (labelled "DRL")
in the underdash fuse block, which is on the driver's side under a black
plastic cover.
1997+ Chevy Camaro and Pontiac Firebird. DRL control module, a cigarette pack sized black box behind the radio. Pop off front panel over radio and heater ducts, 4 clips. The DRL module is clipped to the HVAC duct. The connectors you'll be working with are not hot but some of those leads behind the dash ARE hot, its best to disconnect the battery negative terminal to be sure. The blue connector on the DRL module has eight cavities, but only seven of them are used. Cavity B is empty. I discovered that if that terminal is grounded, your DRLs are disabled. The black wire in cavity A is a ground, so I took the DRL module apart (easy to do, the cover just slips off) and solder-jumpered the A and B terminals on the PCB. This leaves you with no DRLs, your power hatch and handbrake light still works, and it all looks factory. Easy to undo if you want. A switch can be connected in this A to B lead for DRLs as an option. You are jumping a ground, not a hot wire.
1997+ Chevy Camaro and Pontiac Firebird. A few sites that give good instructions to disable the DRLs and Auto Headlights. www.f-body.org has a wealth of information for Camaro and Firebird owners. Disable information is available at leres' page, bpador's page, F-Body FAQ (about 3/4 down the page)
1990 Chevy Cavalier Disconnect DRL module behind battery. Website with photos
1995-1999 Chevy Cavalier and Pontiac Sunfire
On 95-99 model cavaliers and sunfires all you need to do is remove the
cluster and in the harness cut the blue wire that is beside the only
purple in the harness. This is the drl input wire no drls no flashing
lights nothing.
1999 Chevy Cavalier
Web Site.
Remove relay inside car on fuse panel, bend pin #85 or #86 over. May result in
BRAKE dashboard light being illuminated. See 2000 Cavalier below.
2000 Chevy Cavalier and Pontiac Sunfire
I have a better fix for the Cavalier DRL disable, with absolutely NO side
affects. I had to buy the GM service manual to get all the info needed, but
it works perfect.
All you have to do is locate the Body control module located on the
drivers side kick panel ( in front of the door, by your feet) once you are
there, there are three connectors that plug into it. the middle plug has two
rows of pins. The plastic keepers are lettered "A" and "B" unplug the center
plug (the dome light will go off when you do this) locate the "A" & "B"
markings on the darker blue portion of the connector. On the "B" side row of
pins, there is a dark blue wire six spaces over from the one side, seven
over from the other. Cut this wire and simply add on a piece to the side
that goes to the module connector, long enough to reach any good ground lug,
like a screw in the metal part of the dash. Connect the wire to ground, and
inside the body control module, it see this to mean that the regular
headlights are on, and so it energizes the relay that turns off the DRL's.
That's it, try it, it works perfect, NO side Affects. I tried the relay
trick before this, and was not happy with all the added stuff I would have
to do to get around the side affects. besides, I can put this back as easy
as splicing a wire back in place. So PLEASE try this, and save Fuel, and my
eyes, because you might be driving on the same road as me some day, and I
won't blind you.
Note: one reader reports that if you want to add a new remote for
keyless entry you'll need to revert your DRLs to normal to add the remote.
2005 Chevrolet Impala.
Simply pull the DRL relay out of the fuse block under the hood
and bend over pin 87. Why this works:
Pins 87 and 30 are the two pins that are connected together when the relay
is energized. Bending 87 over will still let the relay energize but since
the pin is bent over, the DRL's don't come on. As long as the computer
senses the resistance of the relay coil between the two trigger pins (85
and 86) it thinks all is OK and doesn't set any codes. If you bend over
either of the trigger pins like suggested for other vehicles, the computer
will display "Service Vehicle Soon" in the info center.
Note: probably works for other model years and for Monte Carlo too.
Chevrolet 2000-2005 Impala and Monte Carlo Product available here.
1998 Chevy Lumina
The light sensor is a variable resistor. It varies from a few hundred ohms
to hundreds of thousands. Since most people don't care about the theory, I
will just say that you want low ohms for simulating daytime. However, just
shorting the sensor out could trip failure codes. So, I used a 1,000 ohm
resistor which you can get at Radio Shack (271-153, pkg of 2, 1 watt, 5%
tolerance, $1.41 including TN tax). I removed the dash trim so I had access
to the sensor. The sensor was removed from its socket. I spliced the
resistor across the two leads going into the socket, taped it up, then
reinstalled the sensor. The 1,000 ohm resistor shuns the sensor and keeps
the resistance low regardless of the sensors resistance. (Resistance still
varies but mostly between a few hundred to 1,000 ohms.) The sensor was
re-installed to fill the space, and always be there to revert back to DRL if
the car is later sold. These changes make the system think it is daytime all
the time and defeats the headlights coming on under low light conditions.
The DRL on this car runs power to the right highbeam light (blue wire), which then goes over and through the left highbeam to ground. So, DRL consists of the highbeam lights being in series so they run dimmer. The blue wire was cut near the right highbeam light socket. The blue wire closest to the light socket was splice to an existing ground wire. This action allows the DRL module to still think it is powering the highbeam lights, which it always does because the sensor how tells it its always daytime. But, the power is in a deadend wire (taped off). When the highbeams are turned out, power now goes through the right highbeam, then to ground, rather than being grounded through the DRL module.
2000 Chevy Malibu
Locate BCM (Body Conrtol Modual) underneath passenger side dash. It should
be under the black plastic cover, just beneath the the glove box.
You will see a black box, with three plugs in it.
Locate the center plug. There should be a dark blue wire.
This wire engergizes the relay that disables the DRL's.
If you cut the wire, and ground it out, you system will think the
headlights are on (even though they will be off), thus disabling the DRL's.
Chevy S10 trucks
Web site.
Remove relay under hood on fuse panel, bend pin #85 or #86 over.
1999 Chevy Blazer (S10) ZR2
In the under hood fuse / relay box located above the left front wheel,
remove the relay marked DRL . Fold over pin 85 or 86, ( this is the relay
coil ) reinsert relay.
For auto headlights - The "push the dome over ride 4 times in 6 seconds " does not seem to work on this truck. Remove the passenger dash speaker grille, unplug the light sensor. I didn't have the recommended 1000 OHM resistor , so far 82 OHM is working.
1998 Chevy S10 pickup
There's a fuse box under the hood on the driver's
side. Open that, and remove a diode (which is conveniently labeled "DRL").
That's all there is to disabling the DRLs on this truck. The diode is black
and it's the same shape and size as all the fuses, but it has the schematic
symbol for a diode on it which is a darkened triangle pointing at a vertical
line.
1998 Chevy S-10 and Blazer. Underhood fuse
box, remove black DIODE, 99's may be same, 2000's are not.
AUTO LIGHTS ON:: 98-2000 S-10; remove pass side speaker grill and
unplug sensor, replace with a 1000 ohm resistor.
Chevy S-10 trucks - ZR2. On the ZR2 models there is a relay under the carpet,taped to the wiring harness.You have to cut the CENTER YELLOW wire to kill them. The relay under the hood trick doesnt work. Alternative: pushd the DOME OVERRIDE button 4 times each time you start the vehicle.
1999 Chevy/GMC full size trucks. (Also verified on 2000 model). Here is another way to disable the automatic headlights on a 1999 Chevy Silverado. This is very simple. Remove the radio. Push and twist the photoresister (the black light sensor on top of the dash by the windshield) so it goes beneath the dash. Reach back and disconnect the photoresister from the wire (it should just pop off). Push the wire back up throught the hole (it will be easier to work with this way). For the lights on the '99 chevy to stay off there must be resistence running through the circuit. One way to accomplish this is to run an LED through the circuit. I went to Radio Shack (which I hate doing) and purchased a 12 volt red LED light. I placed the wires in the two holes left by the removing the photoresister connecter at the end of the wire (if your lights don't stay off, swith the wires around in the hole). This is all you need to do. In addition though, I soldered the wires in place and then taped them. I also disassembled the photoresister (use x-acto knives and be careful) and was able to glue it back around the LED light (this keeps there from being a hole in the top of my dash, and makes the light look factory installed). This whole procedure cost me a little over $3.00 for the LED and about 1/2 hour of time.
1999 Chevy/GMC full size trucks + Suburban/Tahoe By the right driver's knee under the dash is a fairly elaborate aluminum finned heat sink. It can be removed by bending the two bottom retaining clips, sliding it down, and unplugging the electrical connector. Presto, chango, no more DRL's! Plus it makes a nice paperweight.
1999+ Chevy/GMC full size trucks
(and maybe some others), have a
temporary disable. Engine running, push DOME OVERRIDE button 4 time
within 6 seconds; and if you did it right, it will beep, and the DRLs
will be disabled, until you turn the truck off. Half-assed, but
better than nothing.
Chevy/GMC 98 full size trucks
(probably same for 96-99 C/K). There is a
cigarette pack sized finned black heat sink (this is a double diode,
2 volt drop) located near the steering column. Unplug the 2 wire
connector, this will remove DRL on any GM car using low beam DRL.
(Will not defeat the auto ON)
1996-1998 Chevy/GMC fullsize trucks
At the bottom of the dash about where your
right knee is there is a small bulge. Under this bulge is a 2" square
finned relay (actually a 2volt drop diode) Use pliers to bend
retaining bracket. Remove and unplug.
1999-2006 Chev/GM full size trucks with dedicated DRLs. Some people have put in amber bulbs, I suggest dead bulbs or remove them altogether. These DRLs burn out frequently. Also, if one amber bulb burns out, the remaining functioning bulb may be interpreted as a turn signal!
2000 Chevy Express and GMC Savana Passenger Van (possibly other years). Pull the fuse named "DRL" in the fuse panel (2nd last row, 3rd fuse from bottom).
2005 Chevy Trailblazer and GMC Envoy. Instructions at forums.trailvoy.com
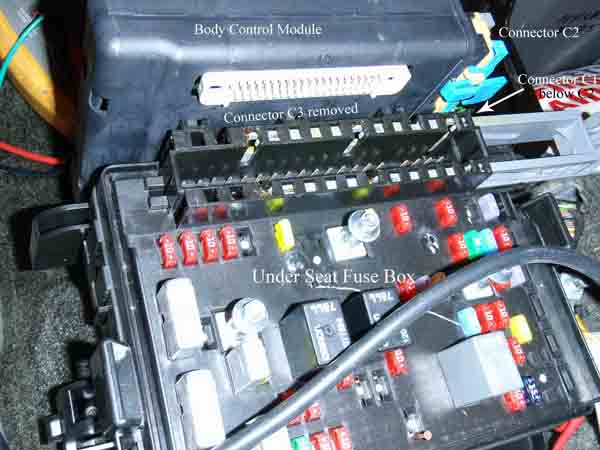
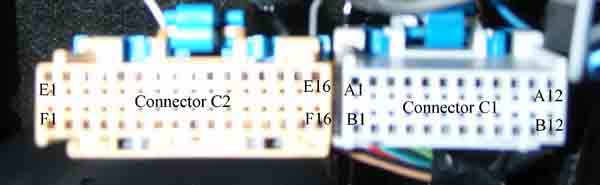
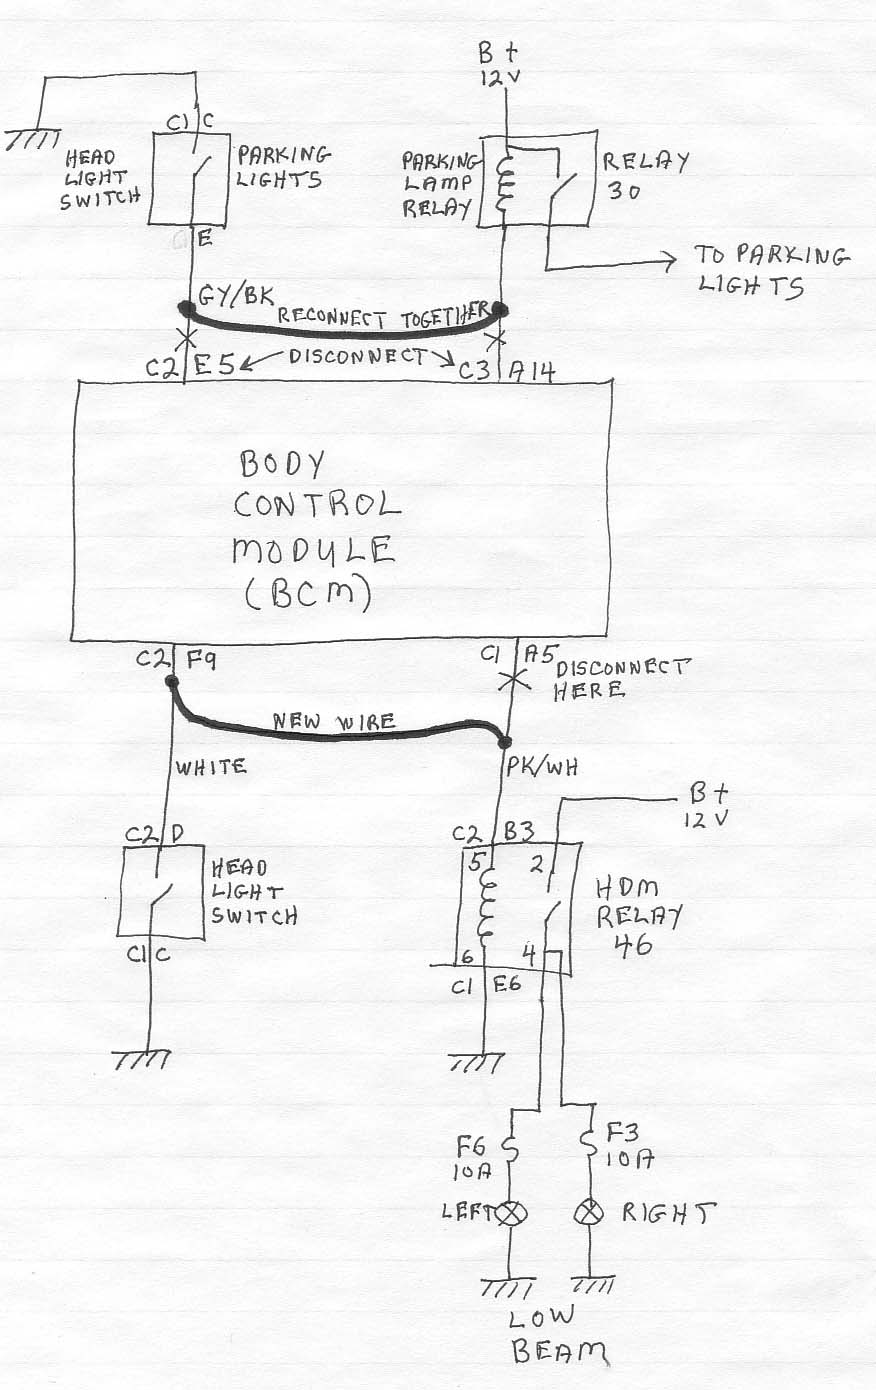
2004 Chevy Trailblazer and GMC Envoy. The headlight switch is normally in the AUTO position and DRL is on every time you crank the car. To turn DRL off, you have to rotate the headlight switch CCW momentarily. For this vehicle, all the switches and inputs go to the computer (Body Control Module - BCM), which is located at the under-seat fuse box. Connector C1 is the bottom connector. Connector C2 is above C1. Connector C3 is the horizontal one that connects to the fuse box with a flat sheet. The BCM program figures out what outputs to turn on and off. There is no single fuse or relay you can remove to disable DRL. It seems like you should be able to ground BCM connector terminal C2-F8 (light green wire), but that does not work. When you get through, there are two anomalies: 1) You will be able to turn your high beams on when the engine is running without the headlight switch being on; (2) When your turn your high beams on with the headlight switch on, both low and high beams will be on.
- Disconnected the pink wire with the white stripe from BCM connector C1-A5 [BCM output to Headlamp Driver Module (HDM) - Looks like a relay, but is a solid state relay type device. The HDM is relay 46 in the hood fuse block.]
- Splice a white wire into the white wire at BCM connector C2-F9 (BCM input from the headlight switch). Connect this new white wire to the pink wire with the white stripe removed in step 1. When your turn your headlights on with the switch, it will provide a signal to the BCM and to the HDM. The high beams will not work unless you keep this input to the BCM.
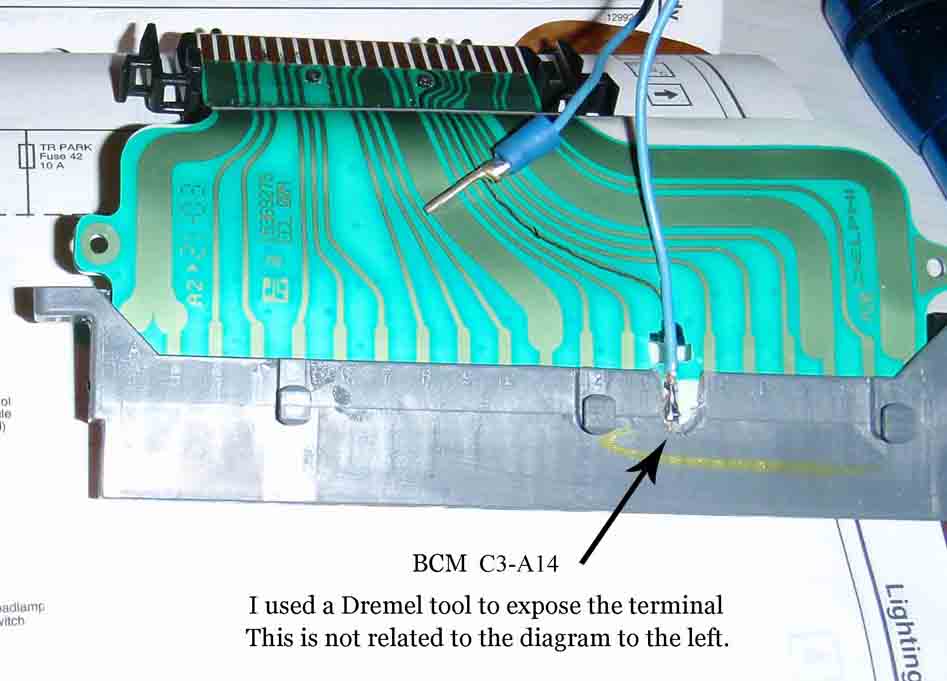
- Cut the wire trace C3-A14 in the flat wire connector C3 to interrupt that signal path. Solder a wire to the fuse box side of A14. Cut away a part of the connector plastic to get to the terminal. See the photo.
- Disconnect the grey wire with the black stripe from terminal C2-E5. Connect this to the wire you just soldered to C3-A14.
This assumes you are familiar with basic troubleshooting and handyman skills and that you will properly insulate your splices, etc. Needless to say, this will void your warranty if it is still in effect.
2017 Chevy Traverse. Under the glove compartment, pop the fuse box cover and under the cover, check for 2 fuses. High Beam and Low Beam DRL. They are both red (10 ams) fuses. No side effects and no warning lights or chimes. Check in the manual to get specifics about fuse panel location. Diagram is under the panel cover.
Photos: BCM• BCM C3-A14• BCM C1-C2• Wiring Changes
1999 & 2003 Chevy Venture Van (perhaps others)
There's a fuse marked "DRL" in the passenger end of the dashboard. Open
the passenger door and there it is. Pull the fuse marked "DRL" and no
more amber DRLs. The headlights also behave normally - on the switch!
1998 GMC Jimmy. There is a sensor on the right speaker grill on top of the dash that turns the headlights on at night or any time it there is low light, you can't turn them off for any reason without turning the key off. Remove the two screw and unplug the senser, using a diode (any size) as a jumper to trick it to think it is always daylight. if it does not work turn the diode around, tape it in place.
1997 GMC Safari Van. Pull fuse #15.
1996 GMC Jimmy and a 1998 GMC Sierra CK
There is a "DRL/Fog" fuse in the fuse
panel left side of the dash, #15, pulling it killed the wretched DRL's
and apparently has not affected any other systems, all other lights
work normally.
2001 Oldsmobile Alero Locate the DRL relay in the main fuse box under the hood, it is #22 corresponding to the diagram on the underside of the fuse box cover. Remove the relay, snip pin 87, and re-insert. Source
2001 Oldsmobile Aurora Detach pin 87 from the DRL relay.
2000-2005 Pontiac Bonneville Remove relay #30 in the fuse panel under the hood. For the high beams to work correctly a jumper wire should be ran from 87a to 30 where the relay would normally be. If this isn't done the driver's side high beam will not operate. See figure
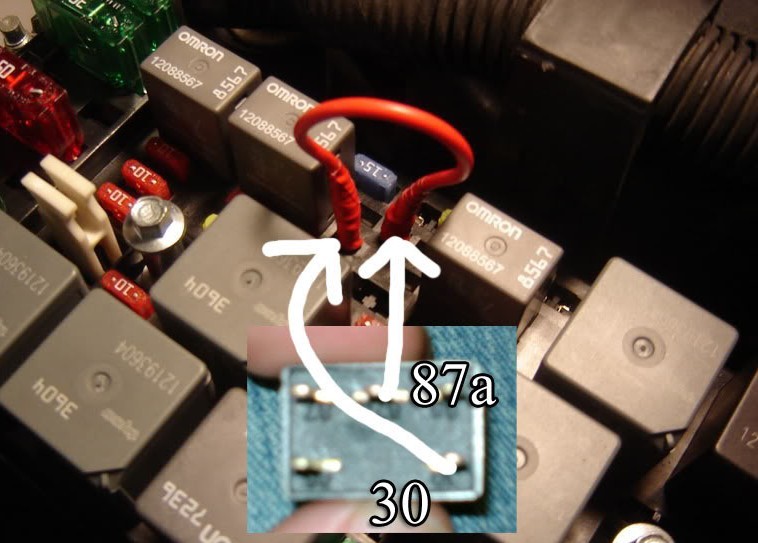
1996-1999 Pontiac Bonneville You must pull the electrical connection from the DRL resistor. The resistor is found on the driver's front side of the engine bay. First, find the large black box which contains the computer. Next, pull the black box to the left so you can see the horn easier. Once you find the black horn, look to your right you will see a small white box thats bolted to the frame of the car. There will be a electrical connection on the back of the white box snap if off and your done. Once the connector is out of the white box you no longer have drls. The head lights will still turn on so there is no need to worry.
1997+ Pontiac Firebird
See 1997+ Chevy Camaro.
2003 Pontiac Grand Am Just go under the hood and remove relay #22 and that will kill the DRL's on a 2003 Grand AM GT. I have heard that this method only works on the 03's.
2000 Pontiac Grand Am I just disabled a 2000 Grand Am which I purchased for my son. Very similar to the instructions for 2000 Saturn. DTR Relay is Relay 22 in the fuse box under the hood. Relay is second in the first row ( upper left looking from driver side). You loose driver side head lamp until the jumper is added. The diagram below is looking from the passenger side of the vehicle.
86  87  87a
--- -+- ---
   __/
  /
-+-     ---
85      30
I found taking a 2 inch long piece 10 gage of ground wire from some house wiring and flattening the ends with a hammer works great to fit the into the relay socket.
1999-2000 Pontiac Grand Am This I know for sure works on 99-00 model GAs. This makes for an alternative for the DRL kits that are no longer in production. There is hint that a fully Plug and Play version is underway which I would recommend if you want to return to stock easily. If you are brave enough to mess with the BCM wiring there here you go.
First do not remove any relays or fuses; however, I highly recommend that you unplug your negative battery terminal.. Don't want to risk popping fuses or pooching the Body Control Module (BCM).
The BCM is located on the passenger side under the dash. There isn't much space to work with so to get the most space I would recommend that you remove your glovebox as well as the under dash panels. The BCM looks like a black box about the size of a CD jewel case. It will have 3 connectors.. 1 pink and two gray.
No DRL
At the BCM, locate Connector C2 (center)
On the "B" side row of pins, locate the dark blue wire (b4)
Cut this wire, leaving as much as possible still attached to the BCM.
Now simply add on a piece of wire to the side that is still connected to the body control module. attach this wire to a good ground, like a screw in the metal part of the dash behind the glove box or I used the interior light mounting bracket screw right there next to the BCM.
The BCM now see's this to mean that the regular headlights are on, and so it energizes the relay that turns off the DRL's.
ALC bypass
At connector C2 find A3 the yellow/black wire, and B2 light green/black
wire.. be careful because there are two light green/black wires on that
connector.. the one you want is closest to the yellow/black wire.
Cut these wires again leaving as much wire as possible attached to the BCM.. simply tie the two wires together and tape them up real good. (this is the same thing as removing ambient light sensor and adding a jumper wire)
The BCM will now think that it is daylight all the time and it will not energize the relay to turn on the headlights.
2001 Pontiac Grand Prix.
Method 1:
Remove access panel from driver's side dashboard. Unplug 2-wire harness
from DRL diode module (shrouded by an aluminum heatsink). Tape up unused
connector to prevent shorts and replace access cover. DONE.
Method 2:
Disabling the DRLs on a GTP( and presumably on other '01 GPs) is
simplicity defined! This should not take you more then 15 minutes.
- Remove the dash bolster then look under the left side of the dash and you will see two modules. The one you want is the smaller of the two and is closest to you as you are looking at it.
- Remove the connectors then remove the module by pushing up and out of the bracket,
- Carefully bend back the locking tabs and slide the circut board out of the case
- You will see three (3) relays on the board. Your interested in the CENTER RELAY. You will need a piece of plastic from one of those clear plastic packages that they seem to put everything from auto parts to toothbrushes in these days .
- Cut a piece aprox. 3/4 inch long and bend a little leg on the end. With the leg you just bent in you fingers, slide the plastic between the contact points of the center relay so they can't meet
- Put everything back together in the reverse order that you used to take it out
What you have now is absolutly no DRLs during the day and still have "AUTO ON" at night. Everything else like the parking brake indicator works just as it should.
2004-2006 Pontiac GTO You can disable the GTO's by going into Relay box in hood on passenger side. Remove the relay for DRL. The DRL stop working, but everything else is ok. Please note that the dash indicator will still show, but other than that works great.
1997 Pontiac Sunfire
This is a 2 part process. May require some special equipment and/or
electrical knowledge. Author is not responsible for damage resulting
from misread information. All info contained within current as of 01 Jan
2003.
Part 1
Behind the front bumper, in front of the radiator should be a relay. Remove plug from the relay. IMPORTANT: Jumper wires #80 and #87a (if uncertain which wire is which, stop now, plug relay back in and please do some research). Temporary method is to attatch a jumper wire to the plug and electrical tape it to prevent water leaking in. Permanent method, cut these two wires at the plug and splice them together. Don't forget heat-shrink. I end-spiced the rest seperately and removed the plug/relay all together. Failure to splice these 2 wires together will result in the passenger headlight not working properly.
Once completed, start car, release e-brake (if automatic tranny: and remove from park [reverse should work]) DRL indicator on dash should flash. If successful, move on to part 2.
Part 2
1) Remove the dash and instument cluster. A shop manual may be needed for this task, if one is not readily available, instructions can be located here.
2) Once instrument cluster is removed, CAREFULLY remove the plastic housing on the rear of the panel. Take caution not to damage the circuit board or you are out to find another instrument panel ($80-175).
3) Once the gauges are free from the circuit board, look at the back of the gauges where the idiot light filters are. Cover the DRL light (the green one) with black electrical tape. If you were like me and found the shift light annoying, go ahead and cover that one too.
4) Reassemble instrument panel and reassemble dash.
If done correctly, you should not see a green blinking light while engine is running and e-brake released (if automatic tranny: and out of park).
2003 Pontiac Vibe (and Toyota Matrix), Toyota Corolla
Great site with
pictures!
Automatic
headlight and DRL disable information.
DRL module located above brake pedal. Remove module.
Cut connecting legs to the board, pins 19 & 20, to kill auto lights.
Kill DRL, cut legs 10 and 11, leave board side of 10 open,
connect board end of 11 to ground (external switch or to leg 2), connect
outgoing 10 and 11 to each other.
Method 2
Kill both DRL and auto lights, cut yellow wire (or leg 8 DRL relay), ground
the module end of wire.
Pontiac Sunfire
Also see Chevy Cavalier.
2002,2003 Saturn SL2, possibly works on the entire S series:
Open hood. Locate fuse box containing Oil Reset switch.
Open fuse box. Locate DRL relay via map on fuse box lid.
Slide thin flatblade screwdriver under relay.
Gently turn the screwdriver to loosen the relay.
Rock relay back-and-forth by hand while pulling up to remove.
At this point, your DRLs are disabled, but so is your right high beam. If you can live with this, close up. If you want it back, get a piece of wire, as large as you can get that will still fit in the hole, and jump position 87 with position 85. In graphical terms:
 86  87  87a
 --- -+- ---
   __/
  /
 -+-     ---
 85      30
2000 Saturn SL1 This is how I disabled the DRLs on my 2000 Saturn SL1. Under the hood go to the fuse and relay box. Where the Oil Reset Switch is located. Use the Diagram on the lid to find the DRL relay. Remove the relay. Using a small flat head screw driver remove the cover on the relay. Insert a piece of non-conductive material in to the gap between the normally open contacts. Put the cover back on the relay. reinsert the relay. put the relay box cover back on. And bingo no more DRL. The only side effect if the green DRL Light on the dash board flashes for a few seconds and then goes out when you first start the car.
Saturn 97 SC2 Check here. Remove center dash pad, 2 screws, look for circuit 592 from the black 18 pin connector on the instrument cluster, term "L", a thin light green/black wire (third connection from end), cut and tape.
2002 and 2003 Saturn Vue These are probably the easiest to disable with no adverse effect. Pull the relay in the engine compartment fuse box and you're done.
Saturn. I simply disconnected the lead going to the high beam DRL bulb of my SC2. I lost my high beams, but if you live in L.A., you rarely use them. (Too much use can get you shot anyway!)
Audi
2013 Audi models (perhaps back to 2010 models), using the MMI interface:
- Select Car (button). Navigate through menus:
- Car Systems
- Vehicle Settings
- Exterior Lighting
- Daytime Running Light->Off
No special tools, or trip to dealer required... :-)
BMW
BMW most models. DRL set by the dealer at owner's request.
Chrysler
2001 Chrysler Concorde (and Dodge Intrepid) Pull the 10 amp sue out of "Cavity" 15. Basically, remove fuse 15. It's in the fuse list in the instruction manual.
Dodge
1994-2002 Dodge Ram I succesfully by-passed them by disconnecting the DRL moudule (drivers side fender well black box directly below the brake booster). I cut the red/orange stripe wire then cut the red/gray stripe wire connected them together and plugged the DRL module back in. I soldered/heat shrink the wires together and installed back in the factory split loom for a clean install. This should work on all 2nd generation Rams, 1994-2002.
1999 DODGE RAM
This is probably superceded by the procedure described above.
The fuse for the DRL is also the fuse for the fog lights,
pull the fuse and you lose DRL's, but your fog lights too. If you unplug
the DRL module, you will also lose your high beams. The only way to
defeat them is to ground out the wire going to your parking brake.
However, you will have to deal with your "Brake On" light staying on in
your dash.
2006+ Dodge Caliber Uses high beam DRLs but can be reprogrammed by the dealer.
Ford
2012+ models. It appears that DRLs are a configurable option on the vehicle's computer. A Ford dealer should be able to connect to the OBD port on the vehicle and disable the DRLs. The aftermarket may also have tuners that can connect to the computer with the ability to disable DRLs.
2012 Fiesta. Remove Fuse F-23 from the ENGINE COMPARTMENT fuse box. Absolutely no side effects such as Chimes, lights, etc. DRLs are gone and lights function normally with the switch. This could possibly apply to previous years.
2011 Transit. Under the hood on the uppper left corner is the engine fuse box. Remove relay 31C and the DRLs are gone. Noe side effects. Lights can be manually turned on/off and no chimes, lights, or anything whatsoever in the instrument cluster. May apply to earlier models as well.
2001 Ford Taurus. Just rendered my DRL'S out of service. The DRL relay pack is located on the left front inner fender panel and is held in by two plastic clips that are bent back to allow easy removal of the holder. Remove the smaller of the two relays (white) in color and drive with out the lights. Everything else appears to function normally.
2004-2007 Ford Taurus and Mercury Sable. The DRL's (if equipped) are softwared into the Smart Junction Box (SJB) which is located in the left side kick panel. The SJB does all vehicle lighting and electrical features and includes the fusebox and keyless entry. This SJB must be replaced to delete the DRL's. I got mine directly from Ford (Part # 5F1Z-15604-C) for about $199.20 and it literally can be replaced by a basic shadetree mechanic in 15 minutes. The new SJB can be ordered with or without keyless entry and comes with two new remotes and includes a new keypad code if yours features the option. There is NO WAY to program the lights off and applying the parking brake one click does turn them out but chimes incessantly when vehicular movement is detected.
2001 Ford F350. The DRL Module for this vehicle is behind the drivers headlight in the engine bay. Just unplug it, I have had zero side effects from doing it.
FORD Taurus/Mecury Sable/others. DRL module located under LF fender, "DRL fuse" located in engine compartment fuse/relay panel. Operates by pulse modulation to reduce voltage to HI beams.
1999 Ford Taurus. Remove fuse #15 from the underhood fuse/relay panel located on the radiator support near the battery.
Ford Explorer 2002-2006. In the fuse box under the hood on the driver's side between the battery and firewall, remove the #14 10A fuse. This controls the DRL module only, no side effects, warning lamps on the dash or loss of any other light functions.
Ford Expedition 1997-1998. Under the hood open the fuse box (driver side) and simply pull out fuse 9. This will disable DRL and no side effects.
FORD F-150 Trucks Replace the DRL relay (located top of pass side dash) with a loop back plug (or modify it). But first try unplugging the dropping resistor (located at Left front of truck, underneath). Web site.
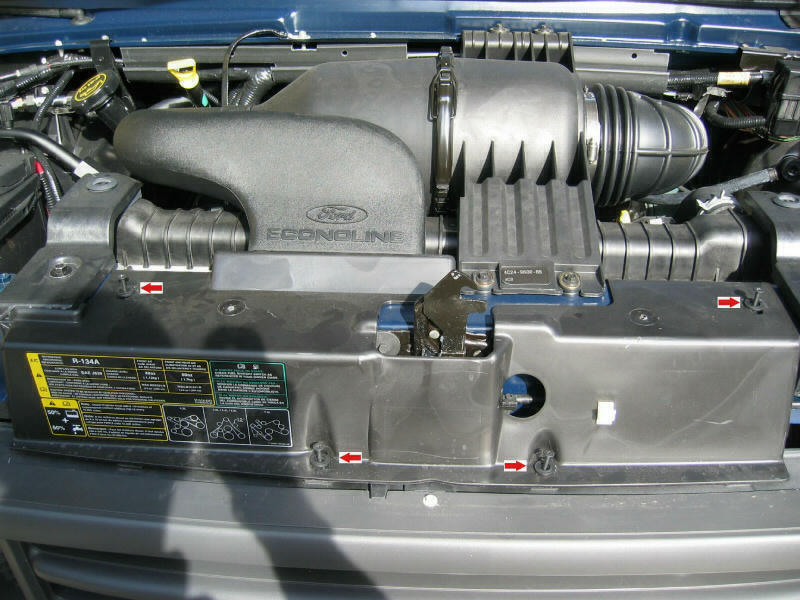
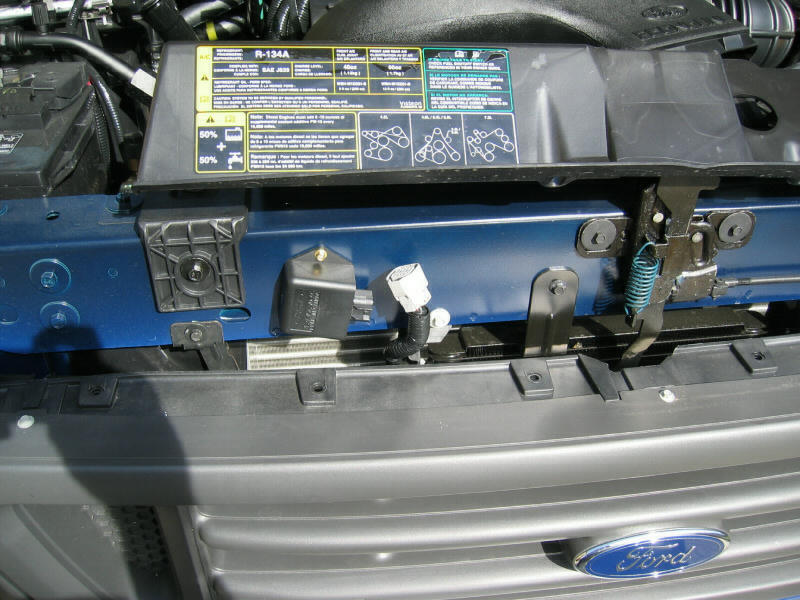
2004 Ford E-250 Van (also reported to work on 2006 E-250)
Loosen this shroud by removing the 4 clips shown.
photo
Pop the air inlet tube out of the shroud, rotate it up and out of the way.
photo
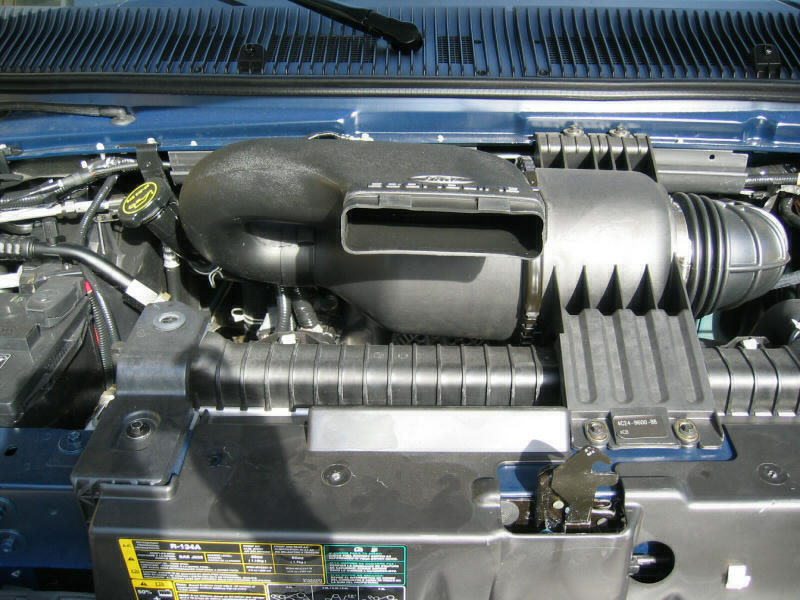
Lift the shroud up. Behind it you will see the Daytime Running Light module. Unplug the gray connector.
photo
Tape up the connectors to keep water out.
photo
Put everything back together. This completely disables the Daytime Running Lights. The headlights still work manually and I have no other problems after doing this.
FORD E-Series - Method 1. On 2005 to Current E-Series vehicles, the DRL's can be disabled by placing a Normally Closed 12 Volt Isolation Relay in circuit 294 (White with Light Blue stripe) near the DRL module and triggering the relay open. The DRL module is located on the passenger side of the grill area in front of the radiator.
FORD E-Series (2005) - Method 2. Follow the 2004 directions to find the 2005 E Series Daytime Running Light Module. Simply cut the power wire (White with Light Blue Stripe) and cap the ends with electrical tape.
FORD F250-550 trucks. On 2005 to 2007 F250-550 trucks, the DRL's can be disabled by placing the common side of the switch of a 12 Volt Isolation Relay to circuit 162 (Light Green with Red stripe) at the Battery Junction Box (BJB) side of the circuit, connecting the Normally Closed Relay pin to circuit 162 away from the BJB and the Normally Open Relay pin to ground. By providing a ground signal on circuit 162, the DRL Relay #1 is opened and the DRL's will not be powered.
FORD F-250 and F-350. Fuse number 12 in the high-amperage fuse box under the hood on '99 and newer F-250/350 superduty. Unfortunately, this will also disable the horn and perhaps other accessories. We are told that for the 2005 models the DRLs are now run through fuse number 13.
Honda/Acura
2012 Civic. Remove fuse #21 (7.5A) under the dash. No more DRLs and no idiot lights. At least Honda made it simple.
2009-2011 Pilot
1. Locate the interior fuse box next to and above the brake pedal
2. Remove fuse #18 "Daytime Running Light Main" (20 Amp) to disable the main DRL control unit - this will light the "DRL" idiot light on the dash any time the DRL would have been on
3 Remove fuse #37 "Day Light" (7.5 Amp) to disable the "DRL" idiot light on the instrument cluster
Done! no re-wiring, no resistors, no power draw, no idiot lights,
and easy to put back to factory if you want to.
2008 Acura TL. Remove fuse #3 (15A) in the interior fuse box. However, the DRL indicator light on the dashboard is tripped when you do this.
2007 Honda Fit. Disconnect DRL module located under the steering wheel, above the pedals. It's about half the size of a VHS tape.
2006+ Honda Civic. Confirmed on 2009 Civic Si as well. Simply remove fuse #37 (7.5A) from the INTERIOR fuse box (under the far left side of the dash). Goodbye DRLs. Absolutely NO after-effects (i.e. - idiot lights, etc.). Clean and simple!
2006 Honda Accord. It's very easy to disable the DRL on the 2006 Accord Coupe. I can only guess that sedans are probably the same. I have done it w/no ill effects other than what I will note. Simply pull fuse #3 from the interior fuse box. It's a 10 amp fuse in the bottom row 3rd from the left. It's clearly shown in the owner's manual. The only downside is that it causes a DRL warning light in the instrument panel to light. It is supposed to tell you there is a problem w/the DRL circuit. It does turn off when you have the headlights on (but not the parking lights). I don't find that the warning light is overly annoying (though that is subjective), especially since it turns off when the headlights are on.
2007 Acura MDX.
In the auxillary underhood
fuse box, there are two 10amp fuses. #1 and #2 for the left and right
DRL respectively. Pull them out...no more DRL. The fuses will not affect
any other system.
Source: acuramdx.org forums
Note, this causes a "Check DRL System" light to come
on in the middle of the instrument panel. One possible fix is to
replace the DRL bulbs with resistors,
tho' a larger wattage resistor may be needed.
2011+ Honda Odyssey If you pull the #27 fuse in the driverside fuse panel on the 2011-12 Honda Odyssey, it will eliminate the DRL's with no idiot lights resulting.
2009 Honda Pilot. I took out two 10 amp fuses in the #12 and #13 slots located under the driver side fuse box. The bright yellow DRL malfunction light will still show on the instrument cluster, so I went a step further and disassembled the dash panels to get the instrument cluster out.
To disassemble the upper dash panel to get to your instrument cluster ... You'll need to first pull off the side cover of the dash board. (To get to it, you'll need to keep the driver door open all the way). There is a screw that holds down the bottom half of the driver dash panel. You will then also need to pull out the left portion of the center console. Once you are able to remove this, you can pull the bottom half of the driver dash panel out. After this is pulled out, you can then pull the upper half of the driver dash panel out. This will give then give you access to take out the instrument cluster.
Turns out that the lights that power the cluster are led lights, not halogen bulbs like I had originally assumed. So I went ahead and cut out an old pice of bicycle innertube (can use anything to cover the led light) and filled it in the light chamber behind the DRL indicator. Each indicator on the instrument cluster has light chambers over the led/circuit board.) I also used black electric tape to cover any possible leaks of light going through that chamber just in case the inner tube wasn't successful in blocking out any of the light. I suppose two layers of black electrical tape will work as well. Then assemble the gauge cluster and dash panels back in reverse order.
Total process took me about 30 minutes. The first 15 was trying to figure out how to to disable everyting w/o breaking anything off.
1997 and later Honda/Acura. To disable the highbeam DRL for all Hondas/Acuras 1997 model year or later, just look for the DRL fuse in the fuse box under the dash. It should be a 7.5A fuse. There is another one that is 10A, but it doesn't need to be removed. This worked for both my 1997 Honda CRV Canadian version and 2004 Acura RSX
Hyundai
Santa Fe (2007). We have reports that the DRLs are disabled simply by removing a fuse from the fuse panel.
H1 (2018) - simple fuse removal.
Jeep
Jeep TJ (2003). Many people disable DRLs (daytime running lights) by unplugging the module itself. This works but will usually disable some other aspect such as your high beam indicator. The Jeep TJ (mine is a 2003 Sahara) uses a motion sensor to send a signal to the DRL module to tell it the Jeep is moving and to activate the daytime running lights. To defeat this, you need to open the cable assembly leading into the DRL and find the wire which is coded WHITE/ORANGE and cut this wire so that the motion signal never reaches the DRL and the lights stay off until YOU want them by YOUR choice. There are no adverse effects whatever; everything else continues to work properly. I went a step further since I do want them on if I am on the highway for a long trip. I cut the wire and connected the two ends of this wire to a switch which is fixed under the hood. One position is DRL ON, the other is DRL OFF. I don't know what years or models this will work for but I suspect it would work for many situations.
Jeep TJ (1997+). (Possibly superceded by above.) Manufactured in Canada come equipped with dim DRL's. To disable them, you need to unplug the control module that operates them. Its located on the firewall under the hood, drivers side; Its about the size of a beeper (pager) Unplug it and make sure it dosen't dangle down onto the engine. The only side effect I have noticed is, the high beam indicator that tells you that your bright lights are on, doesn't work. But who really needs that anyway!!!!
Jeep Grand Cherokee, Auto ON lights. Lift out the dash defroster grill and open up the 3/16" hole (left center) to 3/8" and your lights will come on just after sunset instead of the middle of the afternoon.
Kia
2010 Kia Forte (Canadian Version)
DRL fuse in dashboard fuse panel. No more DRL, no special indicator in
the cluster.
Lotus
2006+ Lotus Elise and Exige
Remove green wire from switch pack D117M0008F.
Details here
(with photos). Note, you do NOT have to remove the instrument panel.
Scroll down on that page to read the comments.
"If you take out the light/starter panel, you can see the switch pack.
Follow the wiring harness, you will see the bullet connector.
Unplug it and tape the bare end. I have the worlds largest hands,
and I had no problem reaching in there."
Mazda
2013 Mazda CX-5 (possibly other models)
PDF document.
2003 Mazda Protege 5
Below are the instruction to disable the DRL's. With these instructions it
disables the DRL's, allows you to use your fog lights as drl's, puts the
drl's on a switch as in my province (Canada) a car needs drl's to pass MVI.
Also when you turn on your hi-beams the fog lights will stay on.
NOTE: The wire colors are SOLID COLOR/STRIP; if there is one color then there is no stripe.
1. Find the Fog Light relay. Located in the drivers side foot well. Look up.
2. Using the 10mm deep socket unbolt the two bolts holding on the DRL, FOG light and other stuff up there.
3. On the FOG LIGHT RELAY cut RED wire about 2" from connector.
4. Crimp a male butt connector on the connector side, and crimp a female butt connector on the harness side.
5. Take a length of wire about 3' and crimp a female butt connector on one end.
6. Plug the new wire into the RED wire you just cut with the male connector on it.
7. Label the free end of this wire as FOG LIGHT RELAY.
8. Find the DRL module. Again located in the drivers side foot well. Look up.
9. Unplug the 2 harnesses. You only need to modify the small harness with 7 wires in it.
10. Cut the YELLOW/GREEN wire about 2" from the connector.
11. Crimp a male butt connector on the connector side, and crimp a female butt connector on the harness side.
12. Cut the BLUE/ORANGE wire about 2" from the connector.
13. Crimp a female butt connector on the connector side, and crimp a male butt connector on the harness side.
14. Plug wire YELLOW/GREEN into wire BLUE/ORANGE on the harness side.
15. Take another length of wire about 3' and crimp a female butt connector on one end.
16. Plug the new wire into wire YELLOW/GREEN on the connector side.
17. Label free end of this wire as DRL OFF.
18. Run both wires up the wire harness and secure with tie wraps.
19. Remove the cover on the side of the dashboard to expose fog light switch.
20. Run the free wires along the harness and into the area of the foglight switch. Use tie wraps to secure.
21. Find a suitable location for the SPST switch. (I used the empty switch plate)
22. Terminate the free wire labeled DRL OFF to one side of the switch.
23. Terminate another length of wire to the other side of the switch.
24. Label this new wire as GROUND.
25. Unplug the fog light switch harness.
26. Cut RED/WHITE wire about 2" from connector.
27. Crimp a male butt connector on the connector side, and crimp a female butt connector on the harness side.
28. Take a length of wire about 1' and crimp a female butt connector on one end.
29. Label the other end GROUND.
30. Connect the new wire to the connector side.
Leave the other end free for now.
31. Splice the wire labeled FOG LIGHT RELAY into the LIGHT GREEN/BLACK wire.
32. Find a good ground location.
33. Take both free wires labeled GROUND and terminate them with a ring lug.
34. Remove the bolt. Put the ring lug over the stud. Fasten the bolt back on.
35. Double check all connections are solid.
36. Plug the harnesses back into the switches.
Mitsubishi
2006+ Galant and Eclipse. Pin 2 on front ECU module. Discussion and pics at mitsubishi-forums.com
Nissan
2011 Versa. Under the hood, look for the fuse compartment, which is just in front of the battery. On the compartment cover, there will be a “DTRL”, which is a 10 amp fuse. Pull that fuse out and that is all. DRL’s are gone and no side effects. Possibly applicable to earlier years.
2012 Sentra (possibly older models too). Pull the 10 AMP fuse labeled DTRL (check for location under the fuse box cover diagram) and that will disable those stupid DRL without side effects (lights, chimes, etc). Lights can be manually controlled with the On/Off switch.
2017 Nissan Altima. Under the hood, remove the fuse cover (check manual for exact location ) and remove the fuse labeled "DTRL". ( 10 amps ). No side effects whatsoever.
Saab
Saab 92-X Remove the glovebox. If you can't figure out how to do it you probably don't have the skill required to complete this installation. It's just a bunch of phillips head screws.
Looking at the gaping hole your glovebox used to occupy, you want to focus on the far-right. There is a small, vertically oriented black box with a white and yellow connector plugged into the bottom of it. Unplug it and screw your glovebox back in. Done.
Saab 900. Remove "DRL fuse" 9-3 is #15, dash side.
Subaru
2013 Subaru Crosstrek XV, 2009-2012 Subaru Forester There is a DRL resister that is only employed during DRL on time so when this resister is disconnected it defeats the DRLs and only the DRLs, all other light functions bypass this resister and are not affected by the removal of this resister being out of circuit. This makes it easy to defeat, but it takes a little effort to get to the resister/connector that is located in front and down of the engine intake air filter housing, mounted to the front of a sheet metal fender cross support. I removed the air filter housing to gain access to the resister connector that has 2 wires green and white going to the resister that is approximately 3 inches long 2 inches wide and 3/4 inch thick, you can also access from the bottom by removing the plastic splash guard. I simply disconnected the resister connector folding back the wire and tying it to itself and making sure the connector points down so as not to collect water.
2014 Subaru Outback Similar to Crosstrek and Forester above, but the location of the resistor is mid left front fender area just above the windshield washer reservoir. Gain access to it by removing the plastic clips that hold the plastic wheel well on starting from the bottom front and then moving it just enough to gain access to the resistor.
2007 Subaru Tribeca. Like some of the other Subaru's the drl module is black approximately 3x4x1.5 inches, has a label that reads SUBARU 84067XA02A UNIT DRL ASSY AISIN made in usa, has a white connector with 10 pins 4 large ones and 6 small ones and 6 wires, a black connector with 8 pins 4 large ones and 4 small ones and 5 wires. The module is located up behind the dashboard left drivers side between the left kick panel and the parking brake up high so it is difficult to see and reach from under the dash looking up, remove the lower panel for access. The black connector has a gray wire going to pin 4 that needs to be disconnected, this wire is the signal coming from the alternator that the engine is running, so that when the engine is running the drl's will turn on. But with this wire disconnected the drl's will always stay on because who ever designed the circuit did not put a voltage drop down resistor in the circuit inside the module, so you need to solder a resistor between 3k ohm and 4 k ohm from pin 4 to ground, a resistor grater than 4.2k ohm will have no effect. I opened up the module's case and soldered a 3.3k ohm 1/4 watt resistor to the back side of the circuit board, doing it this way will retain function if the gray wire is reconnected with the 3.3k ohm resistor in place and will not harm the circuit.
SUBARU LEGACY (unspecified year)
legacygt.com
forums.
2000 SUBARU LEGACY GT. Look underneath the dashboard (driver side) and you will see 2 plastic modules bolted to the steering column. One is usually mounted in Horizontal (Seat Belts Module), the other in vertical (DRL Module). One will have only 1 white connector(horizontal-seat belts), the other (vertical-drl module) will have 2, one black and white. We are concerned about the one with 2 connectors mounted vertical. When you look more closely it will probably have blue label with white letters on it. Here is what my said "UNT DRL ASSY AISIN 84067AE00A," also that module has 2 aluminum plates attached on both sides of the plastic box. Don't unplug the black connector because you will loose most of the functionality of your headlights, just remove the white one. Everything else will work fine, except no more DRL's.
2000-2004 SUBARU LEGACY L and L/SE.
The info on your website for the Subaru Legacy (including 2002 wagon) is not quite correct [ed. note, added "GT" specification above]. It works for Legacy GT headlights, but not for Legacy L/SE lamps. I got the following quote from the post at this forum and have verified that it works (on my own car):
For a non-GT 2000-2004 Legacy (single element headlamp), unplug the same white wire harness as the instruction for the GT model (dual element headlamp). Now as it says on the GT you can leave it unplugged, sadly this doesn't work on the single element headlamps (L & L SE), where this leaves you without any working headlights at all!
What you need to do is with the white harness unhooked, clip the blue/black wire & tape off the cut ends. Then plug the white wire harness back in. Doing this retains all current light function but does disable the DRL.
2003 SUBARU BAJA Same as 2000 LEGACY (above).
2005-2006 SUBARU BAJA SPORT
On Sport models there are indeed two control modules bolted to the
sides of the steering column. Look under the dash and there will be a
module closer to the passenger's side with only one connector, THAT'S
NOT IT. There will also be a module closer to the driver's side THAT
IS IT (both are mounted vertically). The DRL module (the one on the
driver's side) has 2 connectors, one colored black (lower one) and one
colored white (upper one).
The connectors are released by pressing a small tab toward the top, center of the connector, on the long flat side of the connector, also facing the driver's door. Press the tab and pull on the end of the plastic connector, near the wires to free it from the module. Buy unplugging both the black and white connectors you will gain enough play in the harness to pull it just out from under the dash so you can work upright (instead of lying on your back).
Locate the blue/black wire toward the center of the white connector. That is the wire for the signal circuit that you need to leave open to disable the DRLs. YES, you CAN just cut the wire and tape the ends, but IF you wish to leave functionality for future owners or in case regulations change for the worse, you can either cut it and insert a toggle switch OR just remove the pin from the connector.
To remove the pin from the connector take a long, THIN pick (like an O-ring pick or terminal tool) and insert it into the back end (wire end) of the connector for the blue/black terminal. You must insert it on the underside of the pin (on the side with the small plastic tang, basically closer to the center of the connector, but if you are unsure look at the open terminals on the connector to see where the small locktab is). With the pin pressing the locktab down use a small tool (such as the small jaw of a pair of needle-nose pliers) to push on the terminal from the module side of the connector, this should push the terminal and wire completely free of the connector. It takes a little bit of force, but if it takes too much, then you don't have the locktab depressed. Once the terminal is free, simply tape up the ends securely, and tape or wire-tie it back to the harness out of the way. Plug the 2 connectors back in and you're good to go.
(NOTE, for some BAJA Turbo models it is possible that simply unplugging the white connector will do the trick, so try this first to determine whether or not you need to cut/remove the blue/black wire. To test, simple unplug the connector, turn the key to run, and check the headlights. If all lights work, you're good to go. If the headlights don't work with the white connector unplugged, you need to remove the blue/black wire and reconnect the white DRL connector.)
2004 Subaru Forester Disconnect resistor module on passenger side shock tower under the hood, or disconnect the DRL module between the glovebox and the passenger side kick panel inside the car. This may apply to multiple model years. Source: scoobymods forums
2002 SUBARU. Disconnect the ballast resistor (narrow silver box) behind the RF strut tower on the RS2.5 and near the cruise control on the 2002 WRX. Do it when the turbo is cool.
2002 Subaru Outback Limited. When the parking brake is on, it just opens a path to ground through the switch. This ground is transmitted back to the DRL module on pin #4 of the black 8 pin plug through a pink wire. I didn't want the parking brake dash light to stay on so I came up with another solution. I simply snipped the pink wire about 2 inches from the plug and connected a wire from the pink stub coming out of the DRL plug and ran it to ground and just taped off the other snipped pink wire coming from the parking brake switch and let it alone. Voila!!! No DRL and no parking brake dash light! [ed. not sure if this completely disables the BRAKE warning light for other braking system problems]
General (also applies to Saab 92-X). Remove the glovebox. If you can't figure out how to do it you probably don't have the skill required to complete this installation. It's just a bunch of phillips head screws.
Looking at the gaping hole your glovebox used to occupy, you want to focus on the far-right. There is a small, vertically oriented black box with a white and yellow connector plugged into the bottom of it. Unplug it and screw your glovebox back in. Done.
Suzuki
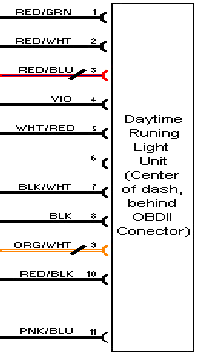
1996 Sidekick Sport
In this car the DRL also controls the Brake, Charging/Alternator
warning lights in the instrument panel and the Head lights in low and
high beam, If You remove the DRL module, all the items described
before will not function.
In the connector of the Daytime Running Light Unit (Is the black
Module behind the ODBII Connector) Cut the next:
Pin 3 RED/BLU Daytime Running Light Resistor
Pin 9 ORG/WHT Daytime Running Light Bulb in Instrument Panel
CAUTION: Check the others cables before cutting it, they may have also silver or grey dots, just to know that is the right module.
You can est it by removing the connector, have wheels chocked, gear in neutral and brake lever released, engine on at idle. If the headlights are off, that is the Module!
If you wish, a Double Pole Single Throw switch can be wired for enabling or disabling the DRL, just wire the Pin 3 in one side of the switch and the Pin 9 in the other side. A switch that looks the same as others installed in the Sidekick (The switch for disabling or place in "valet" mode the Suzuki security system for example) is NKK Switch DPST type:CWSB21AA3F, in www.alliedelec.com is Stock #: 870-0186 for about USD $2.50.
Suzuki Vitara
1. Unplug the DRL module located under the dash to the right of the
steeering column. It's a small silver box with a multi pin plug in its side,
pretty obvious.
2. Lift the circular light sensor on the right side of the dash. Unplug it.
Don't drop the plug into the dash. Retain it and be sure to secure it with
a string attached to the sensor housing so it can be recovered if need be,
and does not rattle
Easy as that!
Toyota/Lexus
Toyota Prius. Description and low-cost parts to put the DRL function on a switch, where it should be. Visit this site.
2006 Toyota Corolla CE (possibly other model years)
Pull fuse 27 in the fuse box under the dash near the brake pedal.
No need to cut wires. QED.
2009 Toyota Corolla
- Remove the glove box and locate the DRL module. It's a black unit mounted sideways with a wiring harness plugged in the side of it.
- Unplug the harness from the module.
- Cut the blue wire at pin 12. Leave at least 3 inches of wire sticking out of the connector in case you ever want to put it back.
- Tape up the end of both blue wires.
- Plug the connector back in.
- Put the glove box back.
It is worth noting that this procedure will also disable the automatic headlights that come on when the sensor detects it is dark. If Toyota uses the same standards in other models such as the 2009 Camry or Avalon as they have for the Corolla, then this procedure should work for those models as well.
2006 Toyota Corolla
Pull fuse #31.
Lexus RX300 and RX350 (recent, but unspecified years). Info at clublexus forums.
2001-2005 Lexus IS300. On the passenger side of the engine compartment near the strut tower there is a vented black box labeled "Hot." Unplugging this box disables the DRLs with no other effects.
1999 LEXUS. I did reliably disable the DRL, by uncovering the DRL relay box, under left front kick panel/glove box. Using the wiring manual, identifying the pin/lead to the parking brake switch, cutting the wire and then grounding that pin.
Simply clicking the parking brake 1 notch, will also work, but activates the dash warning light for the brake.
1999 LEXUS. 30A fuses under hood right rear. Unfortunately this disables the high beams altogether.
TOYOTA. From the Toyota technical service bulletin EL011-00 Web site for specific models determine where the module is; either the DRL relay or the body ECU, connector number, pin #. Oct 6,2000.
Avalon 1999     DRL relay     D4  pin 1
Avalon 2000     body ECU      B5  pin 6
Camry S/D 99*   DRL relay     D6  pin 23
Camry S/D 00*   DRL relay     D6  pin 10 *twilight sentinel
Camry Solara99/00* DRL relay  D6  pin 23
Celica 2000*    body ECU      B6  pin 17
Corolla 99/00*  DRL relay     D3  pin 23
ECHO 2000       DRL relay     D2  pin 12
4Runner 2000    DRL relay     D8  pin 2
Land Cruiser 99/00 DRL relay  D8  pin 2
MR2 Spyder 2000 DRL relay     D2  pin 12
RAV4 99/00      DRL relay     D17 pin 2
Sierra 99/00    DRL relay     D4  pin 2
Tacoma 2000     DRL relay     D8  pin 2
Tundra 2000     DRL relay     D7  pin 2
-disconnect battery- Then remove the wire with pin attached and tape to the harness. (consider just cut and tape the wire) -check operation- [except the 2000 MY-Avalon, additionally you need to ground the wire at the module end of the cut wire] does anyone know if there is a DRL relay that can be "fixed" ?
TOYOTA TUNDRA Tundras with DRL's have two gray electrical connectors located between the battery and the inner fender liner. One of these connectors is fastened to the fender liner and has two black wires leading to another component also fastened to the fender. Disconnect this one and your daylight running lights are inoperative. If you change your mind (please don't) simply reconnect and you are back to stock. www.tundrasolutions.com.
2000-2006 Toyota Tundra and Sequoia A commercial solution that provides a DRL switch. It should have been that way from factory!
2003 Toyota Matrix (and Pontiac Vibe), Toyota Corolla
Great site with
pictures!
Automatic
headlight and DRL disable information.
DRL module located above brake pedal. Remove module.
Cut connecting legs to the board, pins 19 & 20, to kill auto lights.
Kill DRL, cut legs 10 and 11, leave board side of 10 open,
connect board end of 11 to ground (external switch or to leg 2), connect
outgoing 10 and 11 to each other.
Method 2
Kill both DRL and auto lights, cut yellow wire (or leg 8 DRL relay), ground
the module end of wire.
Volkswagen
VW Gen6 Golf/Jetta (possibly other models). You don't need VAGCOM reprogramming unless you have HID Xenon headlights. This worked perfectly in my '10 Jetta wagon. With car off, you turn turnsignal stalk as if making left turn. Then you pull the switch forward towards yourself as if flashing high beams. Hold in that position and turn on ignition... no need to start. After 10-15 seconds, it will ding and the DRL lights won't come on after that.
VW Mark IV Golf, GTI, and Jetta models
Push in on the headlight switch and turn clockise.
Carefully pull out the switch and disconnect the wiring harness.
Cut a small piece of electrical tape and place it over the pin
with the TFL marking just below it.
Reattach the switch to the wiring harness and reinstall the switch
in the dash.
This is completely reversable and does not require the
removal of the #175 relay or any wiring modifications.
VW Jetta (2005+) and Golf/GTI (2006+). The DRLs can be disabled by the dealer via the CAN BUS (diagnostic port). If you're the programming type, see openobd (German).
VW Passat (2005.5+) and Golf/GTI (2006+). You can use VAG-COM, a third-party diagnostic tool for VW and Audi. Ross-Tech, makers of VAG-COM, provide instructions to disable DRLS. This applies to all cars based on the Mk 5 Golf electronics--Audi A3, 2005.5+ Passats, 2005+ Golfs and GTIs and new Jettas. The program is expensive ($299+), but a lot of people around the country who own VAG-COM will help you. You can find such people using the VAG-COM locator.
VW. Change $50 headlight switch, does not sound good to me.
2000 VW Jetta, but I believe it applies to all VW models of recent vintage. Pulling the 173 relay (behind the fuse panel, remove the bottom footwell molding with two screws and pop off the driver's side fuse molding, the relay is visible from underneath) works for disabling DRL but may have the unfortunate consequence of disabling the emergency brake warning light. A solution is (1) to remove the relay, noting its orientation to assist in putting it back; (2) remove the cover of the relay by inserting a small screwdriver into the two tabs on the underside of the relay; (3) placing a 1/4 inch square of electrical tape under the normally-closed relay point, which is on the top of the relay; (4) putting the cover back on the relay--it only goes on one way, there being small slots in the cover to accept the circuit board of the relay; (5) replacing the relay. The relay stays in the normally-closed position, which turns on the headlights. It opens when the emergency brake is pulled. So the tape separating the normally-closed points defeats the DRL. The headlight switch operates normally.
VW Passat (Newest info). On 2001.5 and newer Passats, some people report that pulling Relay 173 as suggested also darkens the parking brake indicator light on the instrument panel. While this may or may not be true, there is an easier method to disable DRLs.
Remove the light switch by turning it off, pressing it in, then turning clockwise and pulling out. Take the switch off the wiring connector to reveal a set of metal tabs.
On 1998-2001 Passats (B5), place a narrow strip of electrical tape over pin TFL to disable the DRL when the light switch is in the OFF position.
On 2001.5-2003 Passats (B5.5) tape over pin B to disable the DRL when the light switch is in the OFF position.
If you have installed the Euroswitch, you need to also tape over pin 56D to disable the DRL when the switch is in the PARKING LIGHTS position.
Information and illustrations can be found at clubb5 forums and some excellent photos by slashpub.
VW Passat (older info). Tilt the steering wheel down to facilitate access to the assembly incorporating the headlights switch and instruments illumination level adjuster. Insert a .9 mm (.035 inch) maximum thickness feeler gauge into the gap above the assembly and just to the left of the illumination adjustment wheel. Slide the blade to the right to push over a tab, thereby disengaging the spring loaded locking mechanism, grasp the headlights switch, and pull out the assembly. Pull out the wiring connector. Disable the wide upper outboard pin (labeled "TFL") with a small rectangle of electrical tape. License plate and running lights remain in DRL mode but may be disabled by pulling (10 amp) fuses 3, 7, and 8.
VW Passat UPDATE
Currently the easiest way to disable the DRLs on the Passat B5.5 is to
remove relay 173 which is on a panel buried up behind the dash.
The light switch can be removed by turning it to the off position,
pressing it in then rotating it to the right to disable the locks,
it can now be pulled out. There is still a TFL tab but I don't know
what it does, if it activates the DRLs then maybe the rest of the
instructions will work.
Website
VW New Beetle. I also participate on a digest where New Beetle owners share information and experiences. Many of the people posting on this have been asking why their low beam headlights burn out so quickly (most have had at least one bulb burn out within the first year of ownership). This is not specific to the New Beetle. Take a look around and note how many cars you see driving around in the daylight with a headlight burned out. Could it be (gasp!) that DRLs are responsible for this? What about the safety aspects of this? Drivers of vehicles with only one light operable can be and are ticketed by the police for good reason -- it's dangerous to drive around with only one headlight. No only is light output reduced, but you stand a chance of losing your remaining light and being in total darkness. DRLs increase this chance by a factor of five when compared to non-DRL equipped vehicles. Rather than a safety feature, they are a safety exposure.
VW New Bug. In L.A. Web site. Relay located just below the headlight switch, remove dash panel, torx20. 98 Bug, relay #8 (second position, second row) unplug it (may be #173) the park brake lite will not function, therefore open the relay and insulate the "normally open" contacts. Replace relay.
VW golf (possibly the A# Jetta as well) Web site. An alternative to the expensive Euro switch thanks to Mike Potter of www.parts4vws.com Remove fuse box cover, bottom of dashboard. Unclip and swing the board out of the way and push the block up. Locate and remove relay #94 or #173 in location #15. Reassemble.
VW-GTI Web site. push light switch in, turn CW, pull out. Remove and tape wire #3.
2002 VW Golf, Jetta IV, Passat B5, and New Beetle Remove relay #173 from under the dash. Cut off #5 spade on relay and re-install. No need to remove it permanently or to pull it apart and tape anything up.
96-99 VW Jetta Lower the fuse panel under the dash. You will see a relay marked with the number 173. Coming out of the back of this relay is a plain yellow wire. Trace this wire and you will find a small connector. Unplug the connector and your DRLs are disabled.
94-95 VW Jetta
The above method only works some of the time (due to wiring changes)
You may attempt this method, however, the the number on the relay would be
94 instead of 173. The other method is to pull the headlight switch from the
dash. You will see a pin on the back of the switch marked "TFL" (German
abbreviation for DRL) Put a piece of electrical tape over the TFL pin and
reinstall connector. You may also cut the wire that leads to the TFL pin.
You may want to crimp on a set of connectors so that the DRLs can be
re-activated if you ever want to sell the car.
More info at
vwvortex forums
2000-2002 VW Eurovan. Remove 4 screws holding panel in place just above cup holder console on dash. Behind that you will find several relays. Yank the one labeled with the big 94. This will essentially make your headlight switch an on/off switch only. Contact parts4vws for a euroswitch which will allow you to use parking lights alone, or headlights...hey, it works just like they did in the good old days!
Volvo
1994 Volvo 850
- Take off the fusebox cover (4-no. T25 screws). It is located under the bonnet right by the RH side of the windscreen.
- Pull out the headlamp relay. It's the largest one, coloured green, that fits into a double socket.
- Prise off the relay cover. This can be awkward since it is a snap- fit with four tongues of plastic that must all be disengaged simultaneously.
- Find the pin marked '56b'. It's a 1/4" tab, and is connected via two loops of thick wire to other pins marked '56bL' and '56bR'. (These other pins lead to the headlamp dipped filaments, and the loops of wire are part of the 'lamp fail' warning system - don't damage them in what you are about to do.)
- Carefully lever up the connection to pin 56b and cut it.
- Push the severed connection back towards the base of the relay and move it to one side so the connection to pin 56b remains broken. It could then be reinstated at a later date if required.
- Refit the relay cover, plug in the relay (it will only go in one way round), and refit the fusebox cover.
2000 Volvo V40 Turn the ignition on. Turn the headlight switch to sidelights, pull and hold the Main Beam stalk. Turn the headlight switch to 0, release the Main Beam. If you do want to leave your car parked with the sidelights/parking lights on, and doors locked, reverse the process
Other Volvo This works on some models. Screwdriver hole adjacent to headlight switch. SAAB and Volvo are only ones that put info in owners manual.
If a vehicle is not listed, first consult the owner's manual and search for a DRL fuse or relay. Next try a shop manual. Again, we repeat our disclaimer:
DISCLAIMERThis information is provided to help those who wish to disable the DRLs on their vehicle. The advice given here was contributed by several people. We give no guarantee whatsoever with respect to its accuracy. USE AT YOUR OWN RISK! We will not be held responsible for ill side effects to your vehicle or to you physically as a result of performing any of the methods described herein. PLEASE TAKE ALL PRECAUTIONS. |

Copyright © 2020, DADRL, All Rights Reserved
Privacy statement